|
CONTROL THE ROLL
Single stockinette rolls. That's its nature. Don't blame the loom, or the yarn or yourself. It just does that. New knitters who have formerly knitted mainly garter stitch or loom knitters who have done double fabrics are often surprised and dismayed about this but we have ways of coping. Stitches that face opposite directions stop the fabric from rolling. These include garter stitch, seed stitch [knit 1 purl 1 alternating with purl 1, knit 1], and ribbing all do the job. They do so because in one way or another they involve stitches facing opposite directions. Therefore, wherever there are stockinette edges that you wish not to roll, make at least 2" of one of these stitches. This includes hems and sides of the work. Even after adding one of these, in some yarns, the fabric will fold next to the controlling stitch pattern. In these cases, washing and blocking or applying a conservative amount of steam can finish the job. About steam: wool and cotton can take a lot but acrylic can "die" meaning that it responds to the steam by relaxing to the point that it loses its former shape and character. When it does, it cannot be revived. While occasionally, killing the fabric can be a design feature, be careful about doing it accidentally and ruining a lot of hard work. When steaming acrylic, use a light touch and do it gradually.
|
BLANKET BASICS
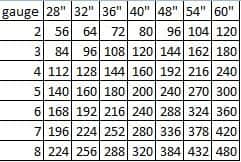
I have seen a lot of questions on knitting groups lately about how many pegs to cast on for a blanket. You need only do a teensy weensy bit of math to know for sure. Since I know that many of you feel that even a small amount of math is too much, I will explain and then I will give you a cheat sheet. You absolutely MUST know your gauge to be sure what size any project will be. Therefore, see the next article over on determining gauge and take the time to do it. You'll be very glad that you did. Width of the blanket=stitches per inch [gauge] times desired width of the blanket in inches. Or it can be stitches per cm and desired width in cm. Simple. If your gauge is 4 stitches per inch and you want a blanket 30" wide 4X30=120 stitches required. It works exactly the same way for length except that it is row gauge X desired length. Below is the promised cheat sheet. 28" is a pretty standard baby blanket width & length, 32" is a larger baby or adult lap blanket. 40-60" are typical afghan size choices. The info in the chart can apply to stitch or row count.
 |
DETERMINING GAUGE
Gauge refers to the number of stitches and rows per inch of a knitted fabric. To determine it, we make a swatch of at least 10 stitches by 10 rows in the intended yarn, using the intended tool whether a loom, needles, machine or whatever. There is just no getting out of knitting the swatch so why not make it something that can be useful like a dishcloth or a little purse. Larger swatches are more accurate gauge measurements than smaller ones. Let the swatch rest for a bit after knitting. Especially on a knitting machine and on some looms, but really using all methods, the size and shape may change a little bit as it relaxes. Now lay a ruler on the fabric and count how many stitches are in 1" and how many rows. Really, a more accurate way is to use a larger measurement such as 4" and divide the count by 4. This makes it easier to determine fractions such as 4.5 stitches. Don't measure at the cast on, bind off or the last column of stitches on either edge. These are not representative of the fabric in general.
so if, in the center of the fabric, you count 16 rows in 4" 16 divided by 4=4 which means you have a gauge of 4 stitches per inch. In the same fabric, it is likely that there will be 5-6 rows per inch as rows are shorter than stitches are wide. With good gauge information, you can be certain that your project will come out the size you intend. Don't assume that because we both used the same yarn and the same tools, we'll get the same gauge. Personal style is a player so you must always make your own gauge swatch on your own tools. Sorry but it's so. Do it and be happy.
|