| All sales are final......books are pdf files delivered via Ravlery. You need not be a Ravelry member to download. |
 All of the personal best sweaters are made with a do-it-yourself cotton/acrylic blend made by combining 2 yarns from Stephanie's Studio: 1 strand 2/15 acrylic plus 1 strand 16/2 cotton. The yarns are very economical and available in many colors. The combined yarn makes a comfortable, washable fabric that gets a gauge of 8 stitches/11.5 rows per inch. using stitch size 6 on the standard gauge or 5 on the Passap machine. Passap knitters see the helpful notes in the box below. A substitute yarn that gets the same gauge may be used. The patterns work on standard gauge Japanese and Passap machines. They dont require a ribber unless you wish to finish your projects with ribbing. An assortment of trims and finishes is provided. |
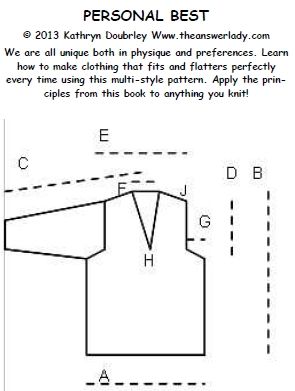
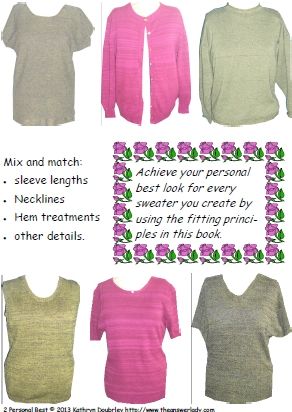 We are all unique both in physique and preferences. Learn how to make clothing that fits and flatters perfectly every time using this multi-style pattern for standard gauge and Passap 5mm machines. Achieve your personal best look for every sweater you create by using the fitting principles in this book. Mix and match sleeve lengths, necklines, hem treatments and other details using the basic patterns in the book, then apply what you have learned to any pattern that you knit. |
TABLE OF CONTENTS
These are machine knitting patterns
Introduction page 4 Hem options page 6 Basic drop shoulder sweater plus tapering or flaring the torso and getting the perfect sleeve length-page 7 cap sleeve T plus neckline adjustment page 13 Modified drop shoulder T plus V neck and shoulder adjustment page 19 Sleeveless top scooped neck plus shoulder width and armhole depth adjustment page 26 Classic short sleeved sweater with set in sleeves plus adjusting the armhole indentation and adding darts page 31 Classic cardigan with set in sleeves, multiple ways of creating and finishing the cardigan fronts plus adjusting size for layering page 40 Make it your own with your favorite finish page 45 49 pages in all. $16 Your book will be delivered via the Ravelry system. 
|
|
PASSAP NOTES [some may help others, too but are essential for Passaps]: I actually knitted about half of these samples on the Passap and half on a Studio machine so I know that they work on both. The terms in the book are not brand specific. I used generic terms to make the book accessible to everyone. For Passap knitters who need a little confidence boost, the notes below are provided. The knitting techniques in these designs are simple. The focus is on refining shapes for a perfect fit. When you receive pattern instructions to place needles in hold, here is how to do it. Hold stitches by using the BX setting with a pusher up under each needle that is working. Lower the pushers when below needles to place them in hold. Ribbing cast on: place every other needle in work on each bed. Rack so that they alternate. Using stockinette setting N/N Knit 1 row [zigzag row] at stitch size 1-2 using orange strippers. Change to circular setting CX/CX. Increase stitch size to about 4. Knit 2 rows. Change to N/N and stitch size for ribbing. Knit rib. A circular hem is easier for Passaps than a hung hem and looks the same. You may wish to substitute this in the patterns that suggest a hung hem. To make one, bring all necessary needles to work on both bed. Rack so that needles alternate and will not hit when all come forward. N/N at stitch size 1-2, knit 1 row using orange strippers. CX/CX at about 3 sizes larger, knit 2 rows. Change to black strippers. At 1 stitch size lower than main knitting, knit the hem rows. Transfer to one bed to continue the piece. These patterns will be easier for you to follow if you use the back as your main bed. You may actually use either bed as the main bed but using the front bed will mean that you must reverse the left/right shaping instructions. Use orange strippers for all double bed work, black for all single bed work. When stockinette is called for, use N/GX or GX/N. I recommend N/GX because knitting on the back bed will make the left/right instructions read correctly. If you prefer to knit on the front bed, youll need to reverse them. Where e-wrapping is essential, it is safest to pull yarn through the feeder with the locks at right. E-wrap using backwards Es from right to left. Manually knit the row left to right. Make sure that all needles are in normal working position. Remove the slack from the yarn so that the tensioner will control it correctly and proceed from there. Beginning on waste yarn and using a row of ravel cord to separate the waste from the main can also be helpful when you must e-wrap. There are quite a few helpful technique videos on my YouTube Channel: theanswerladyknits |